Sunday, March 22, 2020

Walthers Tank Car Repair

This 65' LPG tank car and I go way back. This is a Walthers kit that I assembled in the summer of 1999 while building my first layout. Technically it is too modern for my 1970s-era layout - if you read the fine print on the side of the car there is a reference to testing conducted in 1989 - but I'm not bothered by that. It will look just fine for now.


Note that there is no coupler on one end of the car. The original press-fit coupler box cover fell off at some point and the coupler fell out too. I thought I saved the missing parts, but I sure can't find them now. To get this car back in service, I'm going to fabricate a replacement coupler box cover. I fully expect to find the missing piece as soon as I complete this project.

Step 1 was to remove the one remaining coupler box cover and measure it. Note the raised lip on the top of the cover.

I cut a piece of 0.040" styrene for the new cover and a piece of 0.005" styrene for the raised lip, then laminated them together with styrene cement.

While waiting for the glue to dry, I converted the stock coupler box to be screw-mounted. In order to work on the bottom of the car without damaging the details on the top of the tank, I rested the inverted car on two Accurail boxes, which were just narrow enough to fit between the end grab irons and the center handrails around the dome. I drilled out the hole in the boss on the coupler box with a #50 drill, cut off the pin on the box cover, drilled a #43 hole through the cover, and mounted the cover with a 2-56 screw. This is when I noticed that the car didn't have stirrups. 

The stirrups are separate pieces that fit into the small slots on the corners of the end platform. Luckily I still had the extra parts that I didn't use when I assembled it over 20 years ago. (No, the missing coupler box cover wasn't with them.) The tabs on the stirrups were too big to fit into the slots, so I had to both trim them shorter and file them thinner to get them to fit. I also scraped the paint out of the slots so the styrene cement would bond well. 
This car was already equipped with metal wheels, but they were scale 33"-diameter wheels and this car should have 36" wheels. After installing 36" wheels, I checked the coupler height. It was close, but the coupler wanted to droop a bit. I decided to add shims of 0.005" styrene to the coupler box covers to prevent this.

Here are the coupler box covers with the 0.005" styrene shims installed to prevent coupler droop. I have also drilled a #43 clearance hole in the replacement cover. Next step was to paint the replacement cover black.

While waiting for the paint to dry, I turned my attention to the handrails around the dome. When I originally assembled the car, I did not install the stanchions. This was probably for the same reason I didn't install the stirrups; they didn't fit well straight out of the box.

The stanchions were already too long, but by installing the handrails as shown so that they went all the way through the mounting holes down to the tank, now they were way too long. 

I carefully shortened all 4 stanchions until they fit. I found it easiest to work from the top down, deepening the notch by cutting off thin slices from half of the stanchion thickness only until the notch fit under the handrail. Then I trimmed the excess length from the other half of the stanchion and glued the stanchion in place. Once all 4 were installed, I touched up the paint.

Here's the end of the car with the replacement box cover installed.

Coupler height looks good.

Ready to return to service.


Sunday, March 8, 2020

TP&W Modern Boxcars

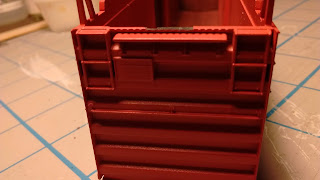
If I remember correctly, I found both of these TP&W boxcars at train shows while I was in college. They are Athearn Blue Box cars custom-decorated by Bev-Bel. In addition to different car numbers, there are also subtle differences in the lettering.


More recently, Athearn and Accurail have both offered models of these cars, but to my eye these newer cars are painted a shade of orange that is too light. The darker orange on the Bev-Bel cars looks more like the few prototype photos I have seen (examples here and here). These two cars were my worst performers on the Illini Railroad Club layout. They had a tendency to come uncoupled from other cars, especially on grades. This performance was likely a consequence of chronically low coupler height, as shown below. I didn't try to fix them back then; they simply got banished from the club layout.


I had one of these cars in the inaugural train on my new layout, and even with no grades, it still came uncoupled from the rest of the train. It's time to fix these cars so I can run them. 

The Easy Way

Probably the most common way to fix low coupler height is to use washers above the trucks to raise the carbody relative to the wheels. I went this route for TP&W 70157.

Prior to installing the washers, I addressed some other low-hanging fruit. Part of the low-coupler problem was that the tops of the coupler boxes weren't sitting flush with the bottom of the weight like they're supposed to be. There were two reasons for this: casting flash on both the car floor and underframe pieces and a bowed weight. These are things that I always check for now when assembling car kits, but I wasn't always so careful in the past.

There were small raised projections and bits of flash on the plastic floor piece that prevented the steel weight from sitting flush with the bottom of the floor. I removed these with a #17 chisel blade.

There were also bits of flash on the top of the underframe piece where you see the small circular indentations on the photo above. I removed these with a #11 blade and filed them smooth with a flat needle file.

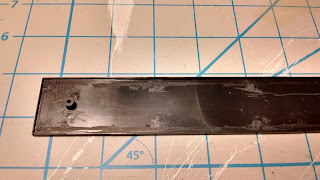
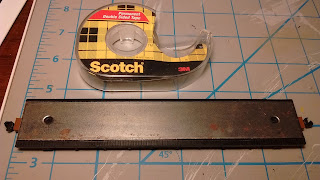
As shown above, the steel weight has a curve to it. Because the weight gets sandwiched between the underframe and the floor, the plastic underframe and floor will flex to conform to the shape of the weight. If the weight is bowed and/or twisted badly enough, then the trucks won't sit square to the rails and the car will track poorly.

I carefully flattened the weight by bending it with my fingers, and also checked to make sure it wasn't twisted.

I added a red (0.015") Kadee washer to each truck bolster as shown above, then reinstalled the trucks. I also replaced the original plastic wheels with Walthers metal ones. The Walthers axles seem slightly too short for the Athearn truck frames; I may have to either replace the trucks or use different wheelsets later if the current configuration causes problems.

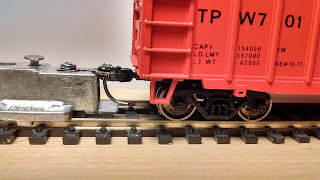
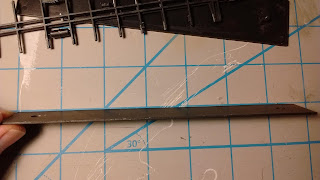
The finished car compared to the Kadee coupler height gauge. The coupler is very slightly low, but much better than before.

The Hard(er) Way

While the washer method was successful at raising the coupler height, the couplers also don't stick out far enough from the end of the car. For car #70138, I decided to modify the underframe to both fix the coupler height without using washers and move the couplers out farther from the car end.

Because the tops of the stock coupler boxes are flush against the weight, raising the coupler boxes would require notching the steel weight. To avoid doing that, I instead decided to install the weight on top of the floor and fill the cavity between the floor and the underframe with styrene. The weight is 0.055" thick, so it can be replaced with pieces of 0.015" and 0.040" Evergreen styrene laminated together. The coupler height needs to be raised approximately 0.015", so I can cut notches in this piece for the coupler boxes.

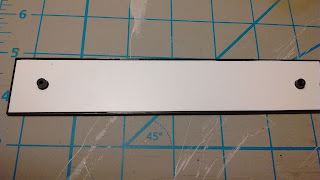
Here's the floor with pieces of styrene cut to replace the weight. Using the weight as a guide, I drilled two 7/32" holes to clear the bosses for the truck screws.
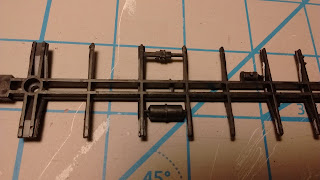
I bought these Walthers cushion coupler pockets because these cars say "Cushion Service" on their sides. However, prototype photos of the TP&W cars don't show the couplers sticking out quite as far as the picture on the Walthers package. I will still use the Walthers parts to replace the original Athearn coupler boxes but won't follow the Walthers mounting instructions.
Here's what the Walthers coupler boxes look like. The "tongs" are supposed to fit in the stock coupler box so that the new box projects out from the end of the car.

The Walthers lids are intended to be glued onto the box, but I want them to be removable for maintenance. I drilled out the boss on the box with a #50 drill and made a hole in the lid with a #43 drill. 

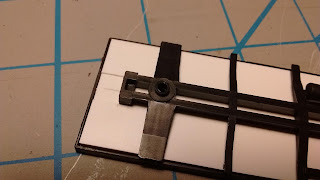
With the underframe in place, I marked the sides and ends of the Athearn coupler boxes with a pencil.

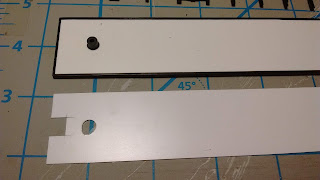
Next, I used the pencil marks as a guide to cut a notch in the 0.015" styrene. Then I cemented the piece of 0.040" styrene to the black plastic floor and cemented the 0.015" piece on top of it.

I sawed off the Athearn coupler box from the underframe as shown. The end of modified underframe lines up with the notch. Mounting the Walthers box in this notch puts the coupler end of the Walthers box about even with the platform on the end of the car, which was right where I wanted it.

I cut the "tongs" off the back of the Walthers box and shortened the lid to match. Then I cemented the Walthers box in the notch in the styrene as shown. I also had to notch the end of the black plastic floor slightly to clear the new raised box.

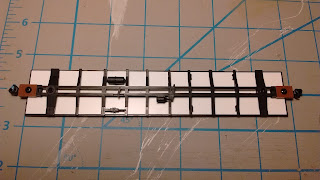
Here's the completed underframe with both new coupler boxes in place.

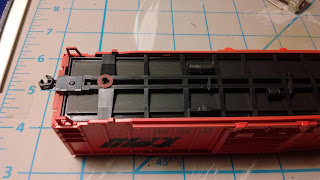
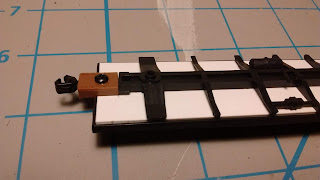
At this point I mounted the trucks and checked the coupler height. Looking good.

I used double-sided tape to attach the weight to the top of the floor.

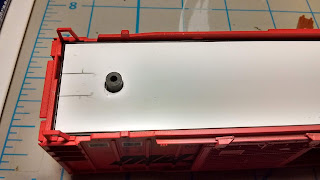
After painting the white styrene and brown coupler boxes black, it was time to install the modified floor/underbody assembly into the car body. I also had to notch the ends of the body to clear the raised coupler boxes. I test-fit the floor into the body and marked the location of the coupler box with a knife as shown above.

I notched the body about even with the middle of the row of molded-on bolts.


Here's the finished product. Coupler height is spot-on, and the coupler now sticks out farther from the end so the cars won't couple too close together.
I like how the 70138 turned out, so I will probably go back later and do the same thing to #70157.

Saturday, March 7, 2020

My TP&W Reference Library

Over the years I've accumulated a collection of print and digital TP&W reference materials that have educated me about the railroad and have been invaluable to my modeling. This blog post will be an annotated bibliography of sorts for the printed materials. I think I have most of the books and articles that have been published about the TP&W, and I thought it might be useful to list them all in one place.

Books About the TP&W

The Peoria Way by Joe McMillan and Robert P. Olmsted (1984) was, to my knowledge, the first book published about the TP&W. Text in this book is limited to the captions of many black-and-white photos, most of which are from the early 1980s. 

Toledo, Peoria & Western, Tried, Proven & Willing by Paul H. Stringham (1993) was the first book I got about the TP&W. This book is mostly text and covers the history of the railroad from the 1850s through the early 1990s. Appendices include things such as steam and diesel locomotive rosters, a caboose roster, a corporate chronology, and a 1931 timetable. This book has a wealth of information though there are some errors, most notably that the text says the 1970 Crescent City explosion happened instead at Weston.

Toledo, Peoria & Western Railroad In Color by Roger Kujawa, J. David Ingles, and David P. Jordan (2007) contains an excellent collection of TP&W color photography. The first few pages of the book provide a nice history of the TP&W from the beginning through the early 2000s, and the rest of the book is photos annotated with informative captions. There is a section at the end devoted to photos of freight cars and cabooses that has been very helpful to my recent modeling efforts. I highly recommend this book to anyone interested in the TP&W.

Books That Feature the TP&W

There are multi-page sections of color TP&W photos in both of the Central Illinois Rails books by J. David Ingles and Richard R. Wallin. 

Trackside Around Peoria with Ed Johnson, 1963-1980 also contains a section about the TP&W. Most of the TP&W photos in this book, including the one on the cover, are from the 1960s.

Here's a good example of judging a book by its cover. This book probably shouldn't even be on this list, but the cover photo of #700 is striking and convinced my child self that this book was worth buying. I remember being disappointed that there is only one TP&W photo inside the book. 

I don't have a copy of Regional Railroads of the Midwest by Steve Glischinski (2007), but this book also has a section about the TP&W. I have seen this book before, however, and I think I remember the TP&W section being mostly about the post-Santa Fe version of the railroad.

Magazines with Articles About the TP&W (Prototype-focused)

Railfan & Railroad magazine ran a great 3-part series about the TP&W in 1983-1984. Part 1 in the July 1983 issue covers the history of the railroad and also includes an interview with TP&W president Robert McMillan.

Part 2 of the series in the September 1983 focuses on the history of the TP&W's locomotives. In my opinion, this is the best article about TP&W motive power and has details that I haven't seen printed anywhere else.
Part 3 of the Railfan & Railroad series in the January 1984 issue is a brief article about the Prairie Marksman, Amtrak's short-lived Peoria to Chicago train that ran on the TP&W from East Peoria to Chenoa.

The May-June 1974 issue of Extra 2200 South has an article about the TP&W diesel locomotive roster. This article pre-dates the TP&W's GP38-2s, which didn't start arriving until 1977.
The November/December 2005 issue of Diesel Era has another article about the TP&W's diesel locomotives. I don't remember where I found many of the magazines featured in this blog post, but I do remember buying this one at a hobby shop in Canada. Not much competition for TP&W stuff up there, eh.
Yet another article about the TP&W's locomotive roster was published in the September 1986 issue of Prototype Modeler, a relatively short-lived model railroading magazine.
The March 1967 issue of Railroad Model Craftsman has an article by Jim Boyd about the TP&W. Most magazine articles about the pre-Santa Fe TP&W were either published around the time of the merger or after the fact, so this article stands out for its perspective during a time when business was booming on the Tip-Up.

Classic Trains magazine has a regular "Fallen Flags" feature, and the TP&W made its appearance in the Winter 2011 issue. This one is recent enough that I actually bought it new. 

The 1990s-era TP&W is the cover story of the October 1998 issue of RailNews (formerly Pacific Rail News).  

The most obscure publication featured in this blog post is this one, Midwestern Rails. This apparently was a newsletter-style  publication that existed in the late 1970s - early 1980s. The two issues in my collection don't have articles about the TP&W, but the back cover pictured above shows a few TP&W features in other issues. I bought my issues of Midwestern Rails at a train show in Minnesota several years ago and remarked to the vendor that I had never seen this publication before. He said that I would probably never see it again, and so far he's been right.

I don't have a copy, but I am aware that the March 1997 issue of Trains magazine has an article about the 1990s-era TP&W.

The now-defunct Model Railroading magazine once ran a series of prototype information articles about EMD GP40s, and TP&W #1000 got a mention in the March 2002 issue

Magazines with TP&W Modeling Articles

Modeling articles about the TP&W are few and far between. To my knowledge, Kevin Piper's article about detailing and painting HO scale TP&W GP38-2s in the September 1989 issue of Model Railroader is the only step-by-step article about modeling a TP&W prototype.

The November 1986 issue of Mainline Modeler has a short article about the green and yellow paint scheme as applied to the road's ALCo RS-11s and includes a scale drawing of one of these locomotives. I have found references to a TP&W article in the February 2000 issue of Mainline Modeler, but I don't have that issue and don't know what the article is about. 

Model Railroading magazine ran a regular "Diesel Detail Close-up" feature that provided a bill of materials (detail parts, paint, decals, etc.) for a superdetailed model of the subject locomotive. TP&W locomotives were the subject of at least 3 articles in this series. Scans of these articles can be viewed online at Trainlife.com at the links below:

Other References

Pictured above are copies of the 1971 and 1972 TP&W Annual Reports. My parents found these in their basement, apparently left behind by a previous owner of the house who was a TP&W shareholder.


Things I Wish I Had

I am a member of the reformed TP&W Historical Society, which publishes a semi-annual newsletter. I am aware that the original incarnation of the TP&W Historical Society also published a newsletter called the Prairie Marksman in the 1980s-1990s, but I have never seen an issue of this publication. Historical society publications are often great sources of information, so I would be very interested in any old issues of the Prairie Marksman.