Sunday, February 16, 2020

Accurail Covered Hopper Upgrade

I'm giving my rolling stock fleet a once-over to ensure that all cars are in a state of good repair. First up is Chicago & Eastern Illinois ACF Centerflow #718574, which is also the first covered hopper I added to my fleet.


This is an older Accurail kit that has friction-fit coupler box covers and uses plastic friction pins to secure the trucks. I prefer screw-mounted couplers and trucks for ease of adjustment and maintenance, so I will retrofit this car with screws. I recently decided to require metal wheels on all cars on the layout, so the stock plastic wheels on this car need to be replaced. The Accumate coupler has been my standard since 1998; I'm not exactly sure why this car is equipped with Bachmann E-Z Mate couplers, but those will need to get replaced with Accumates as well. I suspect that this car was too old to come factory-equipped with Accumates, and I must have just used whatever I had handy when I assembled it.

First, I carefully removed the car floor. The trucks and couplers are both mounted directly to the floor, and the tops of the friction pins are visible from the top of the floor.


I have read in magazines and online forums that other modelers have had issues with the truck pins falling out. My experience has been exactly the opposite; not only have I never had one fall out, but they are very difficult to remove once installed. The best tool I have found for getting them out is a small nail set.


This nail set is just the right size to push the friction pins out from the top side of the floor.


I removed the truck pins first. This was a two-hand job so I couldn't photograph it, but I held the car by the truck bolster in my left hand and then used my right hand to push firmly on the pin with the nail set. Once the truck pins were out, then I repeated the process for the coupler box covers, this time holding the car in my left hand as close to the coupler box as possible.

They're out.
Next, I cut off the pin on the coupler box cover, marked the center of the former pin location, and drilled a #43 hole through the lid. Then I installed an Accumate coupler in the box and mounted the modified lid with a screw. The screws are 3/16" 2-56 Phillips screws purchased in a pack of 100 from Accurail; they are the same screws that are used in newer Accurail kits.


I replaced the stock plastic 33" wheels with Walthers metal 36" wheels, and then mounted the trucks with the same screws. Having screw-mounted trucks allows me to give the car a "three-point suspension" - tighten one truck so that it can only swivel and leave the other a bit looser so it can swivel and also rock slightly.


After reassembling the car, I checked the coupler height. With the stock 33" wheels, the coupler height was a bit low compared to the Kadee height gauge. With the replacement 36" wheels, now the coupler height is just right.

Before: Low coupler with 33" wheels
After: Spot-on coupler height with 36" wheels
With these simple modifications complete, C&EI 718574 is ready for service. I have several other Accurail ACF covered hoppers that will get these modifications too.

Saturday, February 8, 2020

TP&W 902

The Prototype
The TP&W owned 3 EMD GP35s, numbered 900-902 and built in November 1965. These were the last TP&W locomotives delivered in the olive green and yellow paint scheme, and they lacked the diamond-shaped red and yellow TP&W herald that was applied to previous locomotives. ALCo RS-2s 200, 201, and 203 were traded in to EMD and their trucks were reused on the GP35s. All 3 of these locomotives remained in their original paint throughout the 1970s. The 902 appears to have been the first GP35 repainted in red-orange and white circa 1980. The 902 became Santa Fe 3464 in 1984 and was later renumbered to 2963 after being rebuilt with dynamic brakes and EMD trucks. The 2963 became BNSF 2645 and has been rebuilt again as a GP39-3. 

Links to prototype photos:
TP&W 902 in 1977
TP&W 902 in 1980
ATSF 3464 in 1984
BNSF 2645 in 2013
BNSF 2645 in 2014

The Model
I acquired my green Athearn Ready-to-Roll TP&W 902 in 2005. I painted the trucks silver to better match the prototype. The prototype's yellow stripes and lettering rapidly faded to a cream color similar to that used on the model. The font used on the model for the cab numbers and "Toledo Peoria & Western" lettering has never looked quite right to me, but it's at least close. My model 902 got a lot of mileage on the old Illini Railroad Club layout while I was college but has been mostly in storage since 2008.


My 902 needed a bit of a tune-up before I could put it in service on the new layout. All of the axle gears had cracked and needed to be replaced.

Cracked axle gear.
I replaced all 4 axle gears with new Athearn parts. I've made this repair before on other locomotives, but this was the first time I used a C-clamp to help press the axles onto the gears. The new gears are a TIGHT fit on the axles, and my fingers thanked me for using the C-clamp. Once both axle ends were pressed onto the gear, I used a pair of small needle nose pliers to grasp one end of the gear so I could use my fingers to adjust the positions of the wheels as necessary until the gear was centered and the wheels matched the NMRA gauge.

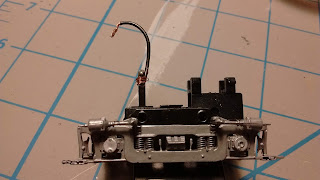
When I removed the locomotive shell, I found something I had completely forgotten about. The wire from the front truck broke off at some point. Lacking a soldering iron and soldering skills in those days, I simply stripped more insulation from the wire, drilled a new hole near the old solder joint, threaded the wire through it, and wrapped the wire around the metal tab on the truck frame. Not pretty, but it seemed to work ok.
No-soldering truck repair
Now seemed like a good time to do a better job and re-solder the wire.

Repairs complete, the model 902 is ready for duty on the new layout.

TP&W 801 Modifications: Part I

As noted in my previous post about TP&W 801, I decided to modify the fuel tank on the Atlas model to better match the prototype. The TP&W tended to purchase its locomotives with the smallest available fuel tank, and the 801 was no exception. The smallest available fuel tank on the ALCo
C-424 had flat sides. Larger-capacity C-424 fuel tanks had bulging sides of multiple lengths. The fuel tank on the stock Atlas C-424 model has long bulging sides, as shown below.


The bulging sides on the Atlas fuel tank are separate parts that snap into the main fuel tank casting. It is simple to remove them from the main fuel tank piece, but this also removes the air reservoirs, which are cast together with the bulges. Prior to removing the entire fuel tank from the frame (this is easiest to do with the shell removed so you can access the fuel tank tabs from the top), I used thin strips of masking tape to mark the locations of the ends of the air reservoirs.


Removing the bulges leaves two rectangular holes in each side of the fuel tank.

I filled these holes with bits of 0.030" styrene cut to fit and cemented in place.

Once the glue had dried, I filled gaps with putty, sanded them smooth, and painted the fuel tank flat black.

I used a razor saw and miter box to separate the air reservoirs from the bulges. With the casting upside down in the miter box, I made the saw cut just on the bulge side of the joint between the air reservoir and bulge.

A sliver of the bulge remained on each air reservoir after the saw cut. I carved and scraped this away with a hobby knife.

I put the fuel tank back on the frame first, then glued the air reservoirs directly to the metal frame using the masking tape as a guide. Once the air reservoirs were glued in place, I removed the tape.

Modifications complete to the fuel tank and air reservoirs.

The 801 is back in service.


Saturday, February 1, 2020

TP&W 801

The Prototype
ALCo C-424 #801 is my favorite TP&W locomotive. The prototype and its twin #800 were built in September 1964 and originally painted olive green with yellow stripes and numbers. The 801 was repainted red-orange and white circa 1972. The first version of the red-orange and white scheme featured small italic numerals on the cab sides and no lettering on the nose. In 1980 the TP&W began replacing the italic numerals on the cab with much larger numerals in a similar font to that used by Conrail and also adding red "TP&W" initials on the nose in the italic font. Circa 1982, the TP&W initials on the 801's nose were redone in the Santa Fe's font (Cooper Black).

Here are some links to good photos of the 801 that show the iterations of its TP&W paint and lettering.
1964
1976
1981
1982

The 800 and 801 were sold to the Morristown & Erie in December 1983 and became M&E 18 and 19, respectively. While attending graduate school in New Jersey, I made a trip up to Morristown and was lucky to find both the 18 and 19 parked outside the shop.

M&E 18 and 19, Morristown, NJ, August 2, 2009

M&E 19 was retired in 2016 and sold to the Tri-State Railway Historical Society in 2017. The summer 2017 issue of Tri-State's newsletter has a nice history of the 801/19.

The Model
Atlas first released HO scale models of TP&W 800 and 801 in their original green and yellow paint in 2003. I received the 801 as a Christmas present that year. Ten years later in 2013, Atlas released the 800 and 801 in red-orange and white. At the time I was planning to build an Illinois Terminal layout and did not purchase one. I was kicking myself about this in 2018 after reverting back to my original intent to build a 1970s TP&W layout, but luckily I found a used red 801 in good condition on eBay last year for a reasonable price.

The Atlas model straight out of the box. The end handrails are left for the modeler to install.
With its Conrail-style cab numerals and Cooper Black initials on the nose, the Atlas model represents the 801 in 1982-1983. So not technically correct for the 1970s but definitely close enough for me at this time. I've been studying photographs of the 801 for many years and have noticed several detail discrepancies between the prototype and the Atlas model. Some of them are relatively minor but would need major surgery to fix, and I'm comfortable just living with those. There are 4 things that stand out to me that I could see myself changing about this model, listed below in the order that I would likely tackle them:
  1. Remove the bulging sides of the fuel tank
  2. Remount the handrails on top of the side sills
  3. Remove the dynamic brakes
  4. Remove the nose lettering and redo the cab numerals in the italic font.
The fuel tank is a simple, low-impact modification that I decided to just go ahead and do now. (Look for a blog post about this soon.) The handrails would require plugging a lot of holes and drilling new ones, but shouldn't be too difficult, especially if I can make a drilling jig. I would need to find a good matching red-orange paint before attempting items 3 and 4 in the list. This is a very attractive model as-is, and for now I'm fine with just modifying the fuel tank and calling it good. It may be a while before I work up the nerve to make more intensive modifications and risk damaging the model.