Saturday, July 22, 2023

The Warped Tour

Athearn Stage (SFRC 56402)

For a long time I had no Santa Fe rolling stock in my fleet. I kind of held a grudge against the Santa Fe for merging the original TP&W out of existence. However, I eventually accepted the reality that if I wanted my TP&W trains to look realistic, they would have to have some Santa Fe cars in them. I was looking for a simple project after completing the east wall of the Legacy Building, so I decided to assemble one of the Santa Fe cars in my kit stash: an old Athearn Blue Box 57' mechanical reefer. Did it turn out to be a simple project? Well...

The underframe had quite a bow to it. Attaching this piece to the steel weight and the plastic floor should straighten it, except...

...the floor was grotesquely warped. I don't think I've ever seen an Athearn floor warped quite this badly.

I assembled the underbody and hoped that attaching the warped plastic parts to the steel weight would sufficiently straighten them out, but no luck. There shouldn't be daylight between the underframe and the floor, and as a result this car would have had drooping couplers. 

I cut a scrap of 1x2 to the same size as the pan in the top of the floor casting, drilled 7 pilot holes down the center of the floor, and then drove 7 wire nails through the underframe and floor into the wood. Attaching the floor and underframe to the wood block straightened them out nicely. I'm not sure I needed to bevel the top corners of the wood, but I thought this might make it easier to snap the floor assembly into the car body.

The wood block took the place of the steel weight. I was a little surprised that the wood actually weighed a bit more than the steel. Watch for my upcoming magazine article, "Weighting Your Freight Cars with Wood." (just kidding)

To match the rest of the car, I painted the brake wheel with a mix of 2 parts Vallejo Model Air 71.130 Orange Rust and 1 part 71.033 Yellow.


Here's the finished car. In addition to painting the brake wheel, I applied Vallejo Black Model Wash to the grills on the car sides to give them some depth, and I also painted the trucks and wheels. I sprayed the truck frames, wheel backs, and axles with Krylon Camouflage Brown. I brush painted the wheel faces with a mix of 2 parts Model Air 71.080 Rust and 1 part 71.130 Orange Rust. Now this car looks better than the rest of the fleet, so I guess I'll be slowly going back and painting the shiny trucks and wheels on my other cars. 

Roundhouse Stage (ATSF 50172)

After completing the reefer, I moved on to what looked like another simple Santa Fe kit, a Roundhouse (Model Die Casting) 50' plug door boxcar.

This kit has a single casting for the floor and underframe and has two pieces of steel for weights instead of one.

It doesn't show up well in the photo, but the plastic floor/underframe casting was both warped and twisted. Attaching the two steel weights wouldn't have done anything to straighten it out, so I found myself going back to the basement to cut another piece of 1x2.

I drilled holes in the bottom of the wood block to clear the plastic bosses on the top of the floor.

I used 5 #2 wood screws to attach the floor to the wood block. I don't have a countersink bit this small, so I used my knife to bevel the edges of the clearance holes in the plastic floor.

Here's the finished car. 2/2 with the wood block trick.

Walthers Stage (CB&Q 95279)

I bought a Walthers 54' GSC flat car kit at a train show way back in 2001, and my teenage self got really frustrated trying to assemble it because the plastic frame casting was warped. The plastic deck and thin steel weight didn't have enough stiffness to counteract the warp in the frame, and the parts kept popping apart when I tried to assemble them. I gave up on this car after several assembly attempts and it's just been sitting in its box until now. Fixing the warped parts on the two Santa Fe cars inspired me to revisit this warped flat car. As the old adage goes, "If at first you don't succeed...wait 22 years and then try again."

The car frame was warped such that the center was higher than the ends (concave down).

 
I couldn't use the wood block trick on a flat car for obvious reasons. I decided that what this car really needed was a backbone, so I bought a piece of 1/8" square steel rod at the hardware store. I notched the four cross members and trimmed the steel so it would fit inside the center sill of the car.

I glued the steel to the plastic frame with 5-minute epoxy and clamped it in place overnight with 3 small C-clamps and styrene spacers.

Now that's what I'm talking about. Compare this straight frame with the warped one in the first picture.

For improved aesthetics, I decided to replace the plastic deck included in the kit with a laser-cut wood deck from American Model Builders. I was prepared for the bitter irony of badly warped wood parts, but luckily for me they were flat.

The four end pieces fit perfectly, and I attached them with cyanoacrylate gel. The main deck piece was slightly too long, so I trimmed it at one end and then attached it to the steel weight with double-sided tape.

At long last, this Burlington flat car is on the active roster.


Tuesday, May 16, 2023

All Done on the Eastern Front

For my next project after completing the two TP&W 40-foot boxcars, I dusted off (literally) my Legacy Building kitbash. The Legacy Building is located in El Paso, IL and appears in the background of many photos of the former Illinois Central/TP&W crossing. Larry Irvin posted a 1981 photo of the Legacy Building on Flickr that has been my main reference for this project.

I started this project in 2021 and did not make any progress on it last year. One reason this project has languished is that last year I seriously considered using 3D printing to make some of the more complex pieces, like the tower and the cornices. Last summer I started trying to draw one of the cornices in SketchUp, and it quickly became clear that it was going to take me A LOT of time to 1) learn how to use the software and 2) use it to draw complex 3D shapes. I decided that this wasn't how I wanted to spend my hobby time, so I'm back to doing things the old-fashioned way. I work at a computer all day for my job, and one of the things I like best about model railroading as a hobby is getting to build things with my hands. I haven't ruled out exploring 3D printing sometime in the future. 

Here's where I left off in 2021. The south wall of the building (on the left) is mostly done, except for the cornice, entrance, and second floor windows. I was in the process of making the basement windows for the east wall (on the right). I resumed work on the east wall.


I made the basement windows from the tops of side wall windows from the Walthers Magnolia Hotel kit. I shortened the gray window castings to fit and made new sills from styrene strip. I made the staircase and first floor door from scraps of styrene. Each step is 0.070" tall and the door is a scale 7 feet tall.


Next I made some of the decorative trim, like the end columns and the second-floor window sill, from styrene sheet. I built up the cornice base from pieces of 0.060" x 0.250" styrene strip and added a piece of 1/12" tile on top.

Instead of trying to use 3D printing to make some of the more complex trim pieces, I looked for other kits that had the features I wanted. I found this Con-Cor/Heljan "Two Brothers Restaurant" in old hobby shop stock. I bought it mostly for its brickwork, but the tower pieces should also be useful.

The second floor windows of the Two Brothers Restaurant are bracketed by trim that looks right for the Legacy Building cornice but would be very tedious to make from scratch.

I carefully cut the upper trim piece from the wall with many, many knife cuts.

Here's the wall with the trim piece installed. The brackets on either end were cut from the Magnolia Hotel's cornice. The ledges that go above and below the tile were cut from 0.010" styrene, and the rounded trim are pieces of 1/8" half-round styrene rod.

The final touches on the cornice are the two finials on either end. I made these from pearlized pins I bought at Michael's and pieces of 1/8" styrene rod.

The supports for the finials are sort-of mushroom-shaped. I achieved this effect by holding pieces of the styrene rod near the barrel of a hot soldering iron. This technique is described in the late Art Curren's article "Details do make the difference" in the December 1992 issue of Model Railroader. This article was a favorite of mine growing up, and it was cool to finally use a technique from it in practice. 

I trimmed the rods to the appropriate length and drilled #71 holes through them for the pins. 

Here's one of the finials in its final position. I shortened the pins with wire cutters and inserted them into #71 holes drilled into the cornice.

The finishing touches on the east wall were the doorknob, made from a piece of 1/32" styrene rod, and the keystones above the first floor windows and door, made from 0.010" styrene sheet. Except for some putty to fill gaps, the east wall is now complete.


Tuesday, March 21, 2023

Boxcar Double or Nothing: Part 2

It was originally my goal to finish these two boxcars by the end of January, but I had to settle for March instead. Free time has been scarce recently, and I ran into a couple of snags with this project too.


TP&W 60031

Finishing this car went about as expected. I had no issues with the Herald King decals despite their age. I knew from previous experience with this decal set a few years ago that the stripes require a lot of tedious trimming and fitting. The pieces of  thick stripe that have the car numbers in them are narrower than the solid white thick stripes, so the latter have to be trimmed to match. My original plan was to number this car 60038, but to minimize cutting and splicing I went with 60031 instead because of how the numbers were arranged on the decal sheet.

I applied the thinner stripe first, then the car number, then the rest of the thicker stripe.

It took many, many applications of Micro Sol to get the stripes to settle down over the door and the rivets. I cut and fit 4 small pieces of decal to make it look like the white stripes pass under the ladder. The ACI tag is from Microscale set MC-4280. I didn't apply the COTS decals because the prototype cars apparently didn't have them.


I finished the car with a couple coats of Vallejo 70.520 Matte Varnish. This stuff is pretty thick straight from the bottle and I hadn't used it in a while, so I looked back at old blog posts to see how much I thinned it the last time around. My post from last year about the 50' TP&W boxcar said I thinned the varnish 3:1, and I don't know how I even got it to spray at that ratio. (Maybe it didn't!) This time I thinned the varnish 1:1 with good results.


TP&W 6001

I had no trouble touching up the paint on #6001 where necessary due to masking miscues. Then it was time to start applying the decals. I purchased Microscale set 87-57 from old hobby shop stock several years ago, and I knew I was taking a risk by doing so. In my experience, Microscale decals are more fragile than other brands and don't seem to hold up as well with age. I could tell from the packaging that the 87-57 set I purchased dated back to at least the 1990s, maybe even the 1980s, but because the hobby shop was located in a basement (i.e., a relatively stable temperature environment) I thought it was possible that the decals might still be usable. Nope. The big "TP&W" speed lettering disintegrated when I tried to float it off the backing. Luckily this decal set is still available, so I purchased a new one online and waited a week for it to arrive.

Once I had a good decal set, the decal application went very quickly for this car because the stripes were already painted. I used the COTS decals from the Herald King set because I thought they looked better than the ones on the Microscale set.

Last year when I painted and decaled an orange 50' TP&W boxcar, I was unpleasantly surprised to find out upon final assembly that the doors somehow ended up a noticeably lighter shade of orange than the rest of the car. This time I remembered to check the color match before applying the decals to the doors, and, sure enough, the doors for #6001 were also a bit lighter orange than the rest of the car. After debating for a while whether it was worth re-masking the white stripes and spraying on a couple more coats of orange, I ended up using a brush to carefully apply 3 more coats of orange to the doors without masking. Once that dried, I applied the remaining decals to the doors and clear coated the car with the Vallejo Matte Varnish. 


This project had been languishing for a while on my workbench, and it feels good to finally finish it.

Sunday, January 22, 2023

A Sound Investment

In December I was tempted by a couple of pre-owned locomotives I saw for sale online. One was a Proto 2000 GP20 painted for the Santa Fe that I thought about modifying to represent one of the 1990s-era TP&W GP20s that I grew up watching. The other locomotive was an undecorated Athearn SW1500 that I would have painted as TP&W #306. While the prices for each locomotive were reasonable, I opted against buying either of them because (1) I didn't want to add more locomotive projects to my queue and (2) neither of these locomotives was likely to get much run time on my layout, so my time and money could be better spent on something else. So, rather than add more locomotives to my fleet I decided to enhance one of my existing locomotives by adding sound. Quality over quantity.

On-board sound is a possibility for me now that I have converted my layout to DCC, but I've been a bit hesitant to take the plunge due to both the expense and the effort required to retrofit sound into older locomotives. At $100+ apiece, sound decoders are not only pricey but also cost more than I've paid for any of my locomotives. Most older HO locomotives weren't designed with sound in mind and the example installations I've seen tend to require milling of weights to make room for the speaker and/or have wires running everywhere under the shell. After my experience adding a non-sound decoder to my Proto 2000 GP30 I wasn't interested in an even more difficult sound decoder installation, but then I discovered the WOWDiesel kits from TCS. There are many versions of these kits that have been engineered to fit in specific locomotives.


The obvious candidate for my first sound locomotive was my favorite, C424 #801. WOWDiesel kit ATL-1 is designed for this Atlas locomotive and others that have similar mechanisms. No milling is required; you simply remove the rear weight and replace it with the speaker mount that's included in the kit. The kit includes a motherboard that's a drop-in replacement for the stock Atlas light board, so the wiring is limited to connecting the existing truck, motor, and headlight wires to the new motherboard along with the 2 speaker wires. The decoder plugs into the motherboard to complete the installation. The installation looked to be about as simple as a sound retrofit could be, so I decided to go for it. 

The starting point for this project. I'll reuse the DP2X non-sound decoder in a different locomotive.

The rear headlight is mounted on the rear weight, so removing this weight as part of the sound installation means I have to make a new rear headlight mount. Prior to disassembly, I took some measurements of the headlight's position. The top of the weight is 1" above the top of the main (black) frame and the tip of the LED is 1 15/32" away from the forward end of the weight.

I disconnected all of the wires from the original circuit board, removed the board, and removed the rear weight. 

Here are the contents of the WOWDiesel kit. From left to right, the decoder, the motherboard, and the speaker and its mounting hardware.

There are no printed installation instructions included with the kit. The TCS website has a comprehensive library of example step-by-step decoder installations with photos, and these are the de facto instructions for the kit. 

I snapped the motherboard over the tabs on the motor mounts, and then installed the 3D-printed speaker mount with the two screws provided. The two wires from the rear truck get routed up through the slots on the sides of the speaker mount and then under the leading edge of the speaker mount towards the motor.

Next I soldered the two purple wires to the tabs on the speaker. On my first attempt I soldered the wires going the other direction because I thought the tabs should go closer to the motor, but in this orientation the tabs interfere with the wires from the rear truck. I then reversed the purple wires so I could mount the speaker with the tabs to the rear of the locomotive. 

I installed the speaker in its mount (but didn't glue it in place yet) and then connected all of the wires to the solder pads on the motherboard. I approached the solder connections like lighting the candles on a birthday cake; start with the innermost locations and then work toward the outside (and try not to burn yourself). The wires to the rear LED seemed a bit short but the front LED wires were longer, so I swapped the two LEDs from their original placement. The red wires on the LEDs are the positive leads. Once I was done with the soldering, I installed the decoder onto the 21-pin plug on the motherboard.

The online instructions suggest using hot glue to attach the speaker to its mount but also caution not to get any glue on the speaker. I had zero confidence in my ability to neatly use hot glue for this task, so I opted to use a silicone adhesive instead.

Bruce Petrarca's article "How Do I Get the Sound Out?" in the August 2012 issue of Model Railroad Hobbyist does a great job of explaining how speakers should be mounted to optimize the sound quality. Basically, both sides of the speaker need to be isolated from each other so that the sound waves from the front of the speaker don't cross paths with the sound waves from the back of the speaker. The TCS speaker mount kind of does this by routing the sound from the back (magnet) side of the speaker down and out of the model around the rear truck, but there is nothing to stop the sound from the top of the speaker from going around the rear of the speaker mount and taking the same path out of the model. I decided to add styrene baffles to the front and rear of the speaker mount to force the sound from the top of the speaker to go straight up and keep it away from the bottom of the speaker. 

Here's the speaker mount with my baffles installed. The rear baffle doubles as the rear headlight mount, and I sized it based on the measurements I took before removing the rear weight. The bottom of the front baffle is slotted to clear the rear driveshaft and allow the rear headlight wires to pass through. I trimmed the tops of the baffles to match contours of the inside top of the shell at each location. I glued the rear LED to my new mount with Microscale Krystal Klear.

At this point, I tested the mechanism on the layout without the shell installed. Everything worked! The engine sounds seemed a bit quiet, but I figured they would be louder with the shell installed.

The baffles route the sound waves from the speaker straight up, but there were no openings on the top of the stock shell to let them out. To remedy this, I opened up 8 slots in the radiator grille. I drilled 8 #72 holes in each slot as shown, and then trimmed out the remaining plastic with my knife. 

 
Here's the bottom view of the completed slots. The clear plastic insert for the rear headlight and number boards prevented me from opening up any of the slots in the fifth row of the radiator grille.

I touched up the orange paint on the modified grille with a mix of 3 parts Vallejo Model Air 71.083 Orange and 1 part 71.130 Orange Rust. This mix was a bit lighter than the factory paint, but close enough for this application, especially after the next step.

To make the opened slots less obvious, I applied about 3 coats of Vallejo 76.518 Black Model Wash to give the radiator grille some depth. This product was easy to use and produced the desired effect, but I found that it took several hours to completely dry between coats.

Once the black wash was dry, I reinstalled the shell on the mechanism to test the complete installation. As expected, the engine sounds were much louder with the shell in place; however, I quickly identified three issues that I easily could have prevented before reassembling the locomotive: (1) the white styrene of the rear baffle was visible through the open slots; (2) when running in reverse, the light from the rear headlight was also visible through the open slots; and (3) when running with the sound muted, a soft thumping sound indicated that a wire was making contact with the drive train. None of these issues was critical, but they bothered me enough to take the shell back off and fix them now rather than later. The rear headlight issue was embarrassing. How did I not think of that?

I painted the rear baffle black and put a strip of black electrical tape over the exposed top of the rear LED. One of the black wires from the rear truck was touching the drive shaft, so I pulled the rear truck wires tighter and taped them to the front baffle. If I do another one of these installations in an Atlas locomotive, I might drill holes in the front edge of the speaker mount for the truck wires rather than routing them through the same space as the drive shaft.

With the installation complete, the next step was to program the appropriate engine and horn sounds. The Alco C424 was equipped with a 16-cylinder Alco 251B diesel engine. I haven't heard one of these running in real life, so I didn't know what it was supposed to sound like. The WOWDiesel decoder has two distinct options for the Alco 251. The one identified as "251 Turbo (Locomotive 1)" has loud, snorting exhaust, especially during the startup routine, while "251 Turbo (Locomotive 2)" is noticeably quieter. The names aren't very descriptive and I didn't know which option was best for the C424. I emailed TCS tech support and they told me that Locomotive 1 is a recording of an RS-23 (inline 6-cylinder 251C) and Locomotive 2 is a recording of an RSD-12 (V-12 251B). Neither is a C424, but I'm not bothered by that because I don't know enough about real locomotives to appreciate the nuances of various engines. I ended up selecting the Locomotive 2 option. 

I didn't know much about locomotive horns before this project. I knew that Leslie and Nathan were the two major horn manufacturers, but that was about it. The Five Chime Consultants Railroad Airhorn Guide (http://atsf.railfan.net/airhorns/index.html) was an excellent reference. After reading the airhorn guide and closely examining many prototype photos of TP&W 801, I concluded that the 801 was equipped with a Nathan P3 horn in the 1970s. The horn casting on the model is not a Nathan P3 and is not mounted in the correct location, but I decided to leave it as-is for now.  


The verdict? I'm very happy with how this project turned out. I think it sounds great, and the installation went pretty smoothly. I won't be equipping every locomotive I have with sound, but I probably will do so eventually for a few favorites. 


Friday, January 6, 2023

Boxcar Double or Nothing: Part 1

For my final modeling act of 2022, I stripped and repainted a pair of 40-foot boxcars. My primary motivation for starting this project was to practice masking a two-color paint scheme before I attempt to paint my GP30.


Microscale decal set 87-57 (on the left) has lettering for 5 different freight cars, one of which is TP&W 40-foot boxcar #6001. This car was painted red-orange with white stripes; the Microscale set includes decals for the lettering only so it requires a two-color paint job with masking for the stripes. Herald King decal set B-430 (on the right) is also for a red-orange TP&W 40-foot boxcar with white stripes. Back in 2018 I made a model of TP&W #60024 using this decal set and liked it so much that I tracked down a second decal set (these are long out of production) so I could do a second car. The Herald King set has decals for the white stripes so it doesn't need masking, but I figured I would go ahead and do this car now too.

Prototype photo of TP&W #6001. Date and photographer unknown.

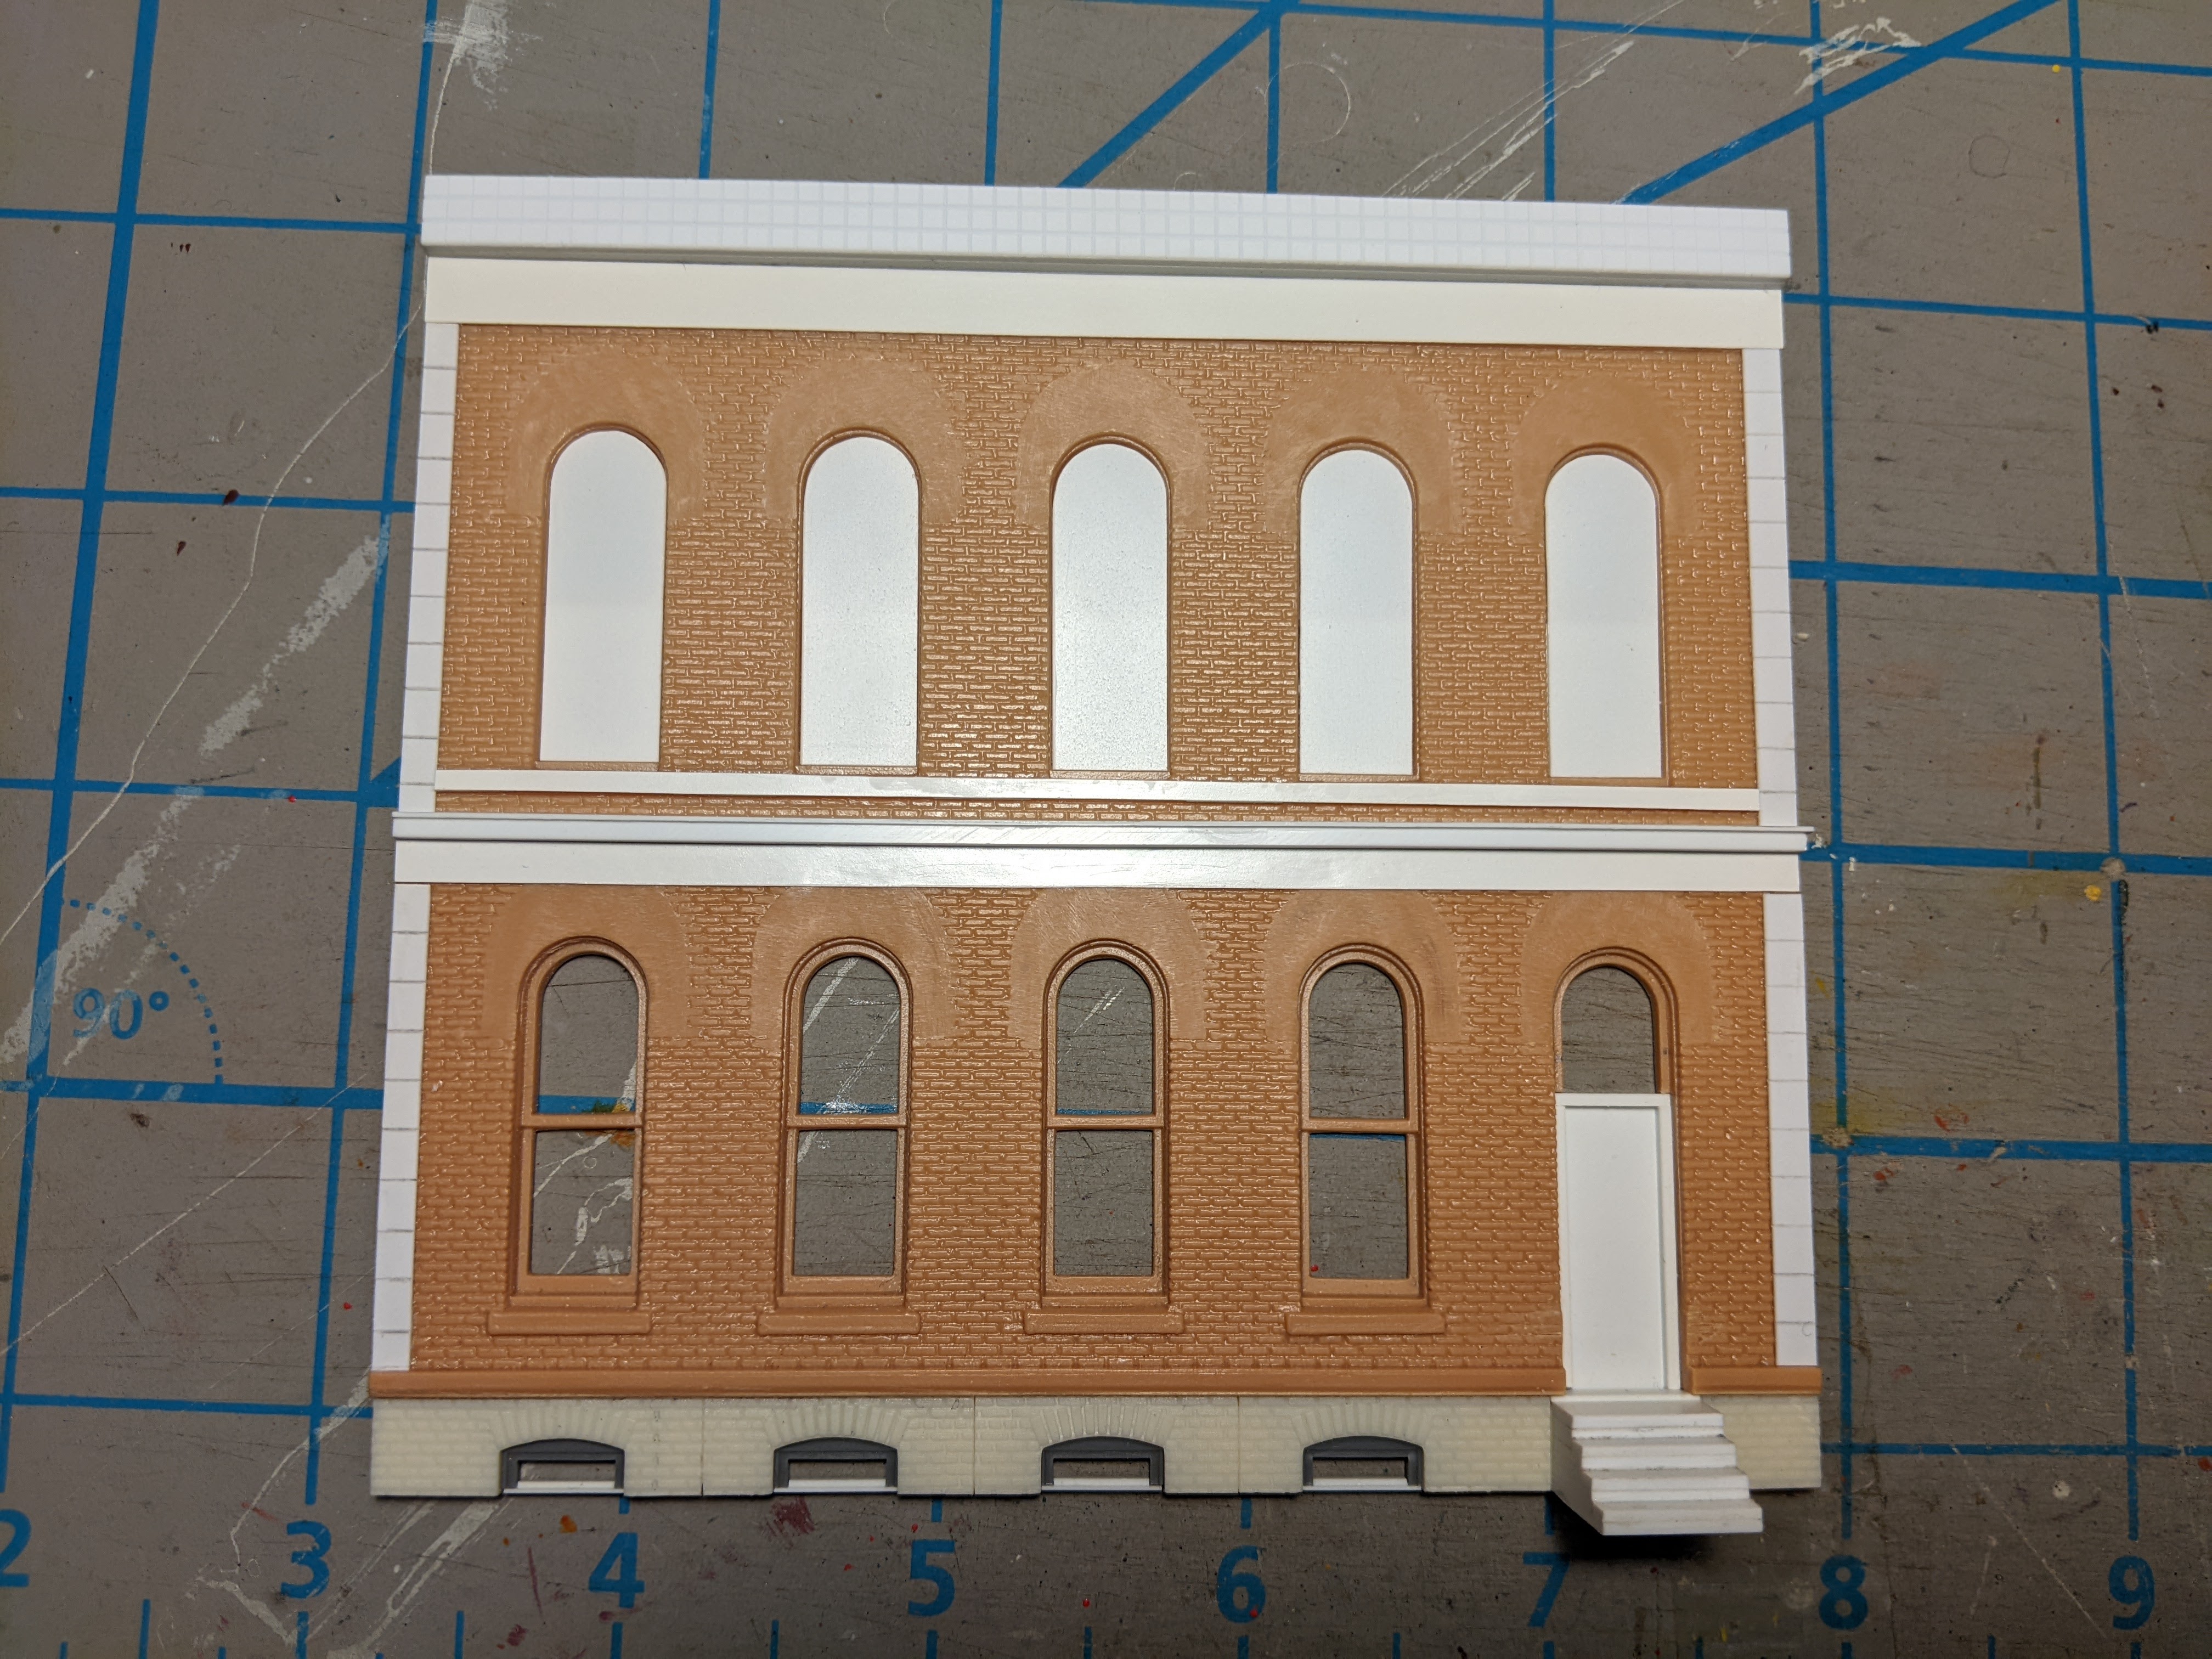
As shown in the photo, TP&W #6001 had an 8-foot Superior (flat-panel) door and no running board. I decided to model it using an Accurail PS-1. The Accurail car is not an exact match for the prototype, but it has the correct door width, it's relatively easy to remove the running board, and (most importantly) I already had one on hand that I wanted to use. 

I've had this Accurail PS-1 for many years. It came factory-painted red with white boxcar data but no railroad lettering. It's been just sitting in its box for quite a while.

Accurail doesn't include Superior doors in their PS-1 kits but they do sell them separately. These doors are intended for one of Accurail's 50-foot boxcar kits and required a bit of trimming to fit my PS-1. 

The Herald King decal set is for a 40' car numbered in the 60000 series. For this car, I started with an Accurail 40' AAR boxcar lettered for the Great Northern. The Accurail car has a 6' Youngstown (corrugated) door. The prototype cars in the 60000 series had a variety of doors, and I decided to go with #60038 after finding a prototype photo that showed this car had the same door as the Accurail car.


I liked the 1960s-era red Great Northern paint job on this car, but I was willing to strip and repaint it because I'm a bigger fan of the 1970s-era TP&W red-orange and white paint scheme.

I used Super Clean Degreaser to strip the factory paint and lettering from both cars. The red paint on the PS-1 washed off very easily after soaking in the degreaser for about 24 hours. On the other hand, the red paint on the Great Northern car was much more stubborn and required a multi-day soak and a lot of scrubbing with a toothbrush to mostly remove. 

Here's the former Great Northern car after stripping the paint. I couldn't quite get all of the paint off, especially on the ends and the corners, but this should be good enough.


Here are the modified PS-1 body and doors prior to priming. I filled the running board holes on the roof with scraps of styrene, trimmed the plugs to match the surrounding roof, applied putty to gaps, and filed and sanded everything smooth. I had to remove about 1/32" from the bottom of each door so they would fit this car.

I primed both cars with Vallejo Grey Surface Primer (70.601). When I've used this primer in the past I haven't thinned it because the Vallejo FAQs say that thinning diminishes its polyurethane component and "the less dilution the better." However, I've had to spray it at a high pressure (~40 psi) due to its viscosity and it's been difficult to get a uniform coat. In one of his YouTube videos, Vallejo master painter Don Suratos recommends thinning the primer 1:1 with his "thinning sauce," which is a mixture of 2 parts thinner to 1 part flow improver. I tried his method for these two boxcars with excellent results. Many light coats of the thinned primer at 25 psi produced an excellent finish. I will always thin the primer from now on.

Here's the primed PS-1.

I let the primer dry for about 24 hours before spraying the sides of the PS-1 with Vallejo Model Air 71.001 White. For models like this one that will be decaled, I like to add Vallejo 70.470 Gloss Medium to the flat Model Air paints so they will dry shiny enough that I don't have to apply a separate clear gloss coat. A 2:1 ratio of paint to gloss medium has worked well for me. I also thinned this mixture 4:1 with the "thinning sauce," so the complete mix worked out to:

  • 8 parts paint
  • 4 parts gloss medium (70.470)
  • 2 parts thinner (71.261)
  • 1 part flow improver (71.262).

The primer is a very light grey, so it was difficult to tell where I had applied the white paint. For future models that will receive a coat of white, I might think about using a mix of grey and black primer for a darker undercoat. 

After the white had dried for 24 hours, I masked off the stripes on the PS-1 body and doors. I used strips of blue painter's tape for this. I used the prototype photo of #6001 and the Accurail doors to estimate actual thicknesses of 3/16" (about 16 scale inches) for the upper stripe and 5/64" (about 7 scale inches) for the lower stripe. 

I applied the masking tape to the doors first, then used the door as a guide to place the masking on the car body.

Here are the two cars prior to being painted orange.

I used Model Air 71.086 Light Red for the TP&W red-orange, mixed with gloss medium, thinner, and flow improver as described above. Next time around I think I'll try using the thinning sauce in a ratio of 3 parts gloss paint to 1 part sauce instead of 4:1 because the gloss medium is rather thick. I had some trouble with the paint drying in the tip of my airbrush, and I think additional thinning would probably help with that.

The first coat of Light Red always looks very yellow, but it gets much redder with additional coats. I applied the paint in many thin coats. I have to exercise a lot of patience to resist the temptation to apply thick coats for faster coverage.

Here are the painted PS-1 body and doors, ready for the masking to be removed.

The upper white stripes turned out great on the doors, but some orange bled under the tape on the lower stripes around the tack boards.

The stripes on the car body had a few small spots of orange but were otherwise pretty good.

My biggest fear for the masking was having the white paint pull off with the tape, but luckily this wasn't a problem except for one catastrophic spot on one of the door frames.

The bad spot where both the white paint and primer peeled off down to the red plastic. I'll touch this up, but thankfully this spot will be mostly covered by the door.

Overall I'd give myself a "B" for the painting and masking job on #6001. I think it's pretty good overall, but some touch-up is needed. There will be a Part 2 of this post once I've completed the touch-up painting and decaling of both cars.